Our vision is of a place where local people of all ages can come together, feel part of our community, learn from each other and celebrate our remarkable heritage.
We want to give the Caerphilly Miners back to the community!
Craft Wall
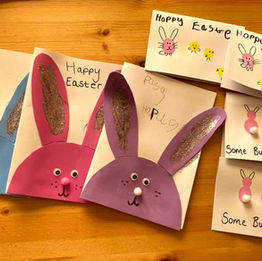
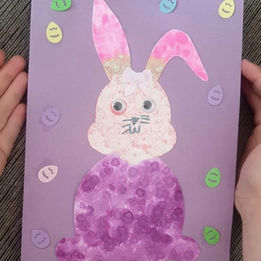
Our craft groups have shared some of their creations as inspiration. Please get n touch to find out more about our craft class, and things you can do from home until our doors open again.
Craft Wall
Children's Easter Craft Competition
- 2021 -
Competition Entry Instructions
_edited.jpg)
Enter our Children's Easter Craft Competition to try your luck at winning a Chocolate Hamper!
There will be a prize each for the 3-5 yrs and 6-10 yrs age groups.
You can make any Easter craft you like and all entries will be proudly displayed on this page. Please send a photo of your Easter craft with your child's first name and age to marketing@caerphillyminerscentre.org.uk or send to our FB page by 4th April. The judging will take place on 6th April, thanks.

_edited.jpg)
_edited.jpg)
Easter Craft Ideas to Make from Home
Make a Bunny card
.jpg)
.jpg)

What you do
1) Fold the card in half
2) Draw half a bunny shape (as shown) using the folded line as the middle
What you need
• One piece of white card
• Pencil
• Crayons
• Cotton
• Glue
• Scissors


3) Cut out the bunny (as shown)
4) Draw face and whiskers on one side
5) Paste the cotton tail on the other side
Make an Easter Basket

What you need
-
An egg box
-
A strip of cardboard
-
Scissors
-
4 pipe cleaners/ strong string
-
Paints
-
Crayons
-
Wool
-
Bits of paper
-
Ribbon
-
Pencil
-
Crayons
-
Cotton
-
Glue
-
Scissors

_edited.jpg)
What you do
1) Cut the top off the egg box.
2) Cut a handle from the cardboard.
3) Put a hole through the handle and egg box (as shown). Do this on both sides.
4) Put two pipe cleaners/ strong string through each hole (as shown).

5) Tie.
6) Make your basket pretty by painting it.
7) If you wish, you can fill your basket with flowers or eggs or jelly beans.
Make an Easter Egg Hat
_edited.jpg)
What you need
-
A paper plate hat/ card
-
Crayons/ felt tips
-
Scissors
-
Pencils
-
Coloured paper/ card
-
Stickers
-
Glue
-
Sellotape
_edited.jpg)
What you do
1) Take a paper plate or a piece of card and use a side plate to draw around in pencil and cut out.
2) Draw out an egg shape near the bottom and cut around it or alternatively cut out an egg shape on a separate piece of card and tape to base of the plate rim.

3) Colour in green or your chosen colour and stick on stickers or pieces of coloured paper/card
(This method could also be applied in making a bunny or chick).
Make an Easter Wreath

What you need
-
Paper plate
-
Spring and Easter themed/colored paper
-
Glue
-
Glue Dots
-
Ribbon (we used a 7/8″ wide craft ribbon)
-
Egg Cookie Cutter or oval cookie cutter
-
Scissors

What you do
1) Cut the inner portion from the paper plate, so that your have the outer portion intact.
2.) If your paper has a design on it, turn it over and trace the cookie cutter onto the paper for a template.
3) Cut the eggs from the paper and glue onto the back of the paper plate wreath.
.jpg)
4) Cut a piece of ribbon, make a bow, use a glue dot, and attach to the top of the wreath.
5) Cut another piece of ribbon, form a loop, use a glue dot, and attach to the back of the wreath.
6) Hang and enjoy for Easter.

Make an Easter Bunny Craft (with a cardboard tube)
What you need
-
Pink paper
-
White paper
-
Toilet roll
-
Pink & dark pink crayon
-
Felt tips
-
Cotton wool/ pom pom
-
Googly eyes

You could adapt this method to make a chick!
1) Take a cardboard tube and wrap it in pink paper and cut to size and stick on. If you don’t have pink paper you can colour in white paper with a pink crayon and stick on instead.
2) Cut out 2 large bunny ears from pink paper and 2 smaller white ears from white paper and stick the white ears to the pink ones.
3) Then stick on the ears inside the tube so it’s front facing.
4) Using a felt tip draw on the bunny’s facial features: eyes, mouth, and whiskers. You could use googly eyes if preferred. Cut out a pink triangle from pink paper or alternatively use white paper and colour in darker pink.
5) Stick on a white pom pom or cotton wool for its tail.
Make a No Sew Easter Bunny Craft

What you need
-
Unmatched socks
-
Uncooked rice (around 1 cup per bunny)
-
Rubber bands
-
Black Sharpie Marker (or any black marker)
-
Pretty Ribbon (Optional)
-
Scissors

What you do
1. Take the sock and place it over a tall glass so its easier to pour the rice into.
2. Poor the rice into the sock. You can use a measuring pyrex cup to make it easier to pour, but you can use anything.
3. Take the rubber band and tie the top close
4: To make the head and body shape, take another rubber band and tie it between the head and the body.


_edited.jpg)

5: Use another rubber band and make the bunny tail.
6. To make the ears, cut any excess sock so that there is a couple of inches for the ears.
Once the excess is gone, cut the top portion down the middle.
7. Using a marker, draw on a bunny ear shape. Take your scissors and cut along the marker line. Once done, your bunny ears should stand up straight (or flop down if you want floppy ears)
8. Use the Sharpie to draw the bunny eyes and nose. To make the eyes, simply color in two dots with the marker
To make the nose, draw an “x” shape.
9. Tie a piece of ribbon around his neck for the finishing touch.

Make Papier Mache Eggs


Make Papier Mache Eggs


1) Inflate a balloon.
Blow air into an oval balloon until it reaches the desired size.
2) Make the 1st papier mache layer.
What you need
-
Water balloons or oval balloons
-
Paper
-
White glue or papier mache paste
-
Scissors
-
Paint brush
-
Acrylic paint (optional)
-
Glitter glue (optional)
-
Clear acrylic sealer (optional)


3) Make the 2nd papier mache layer and let it completely dry for at least a day.


.jpg)

4) Decorate the egg! You couuld stick on paper starts and brush over them with glue whilst the egg is wet.or after it dries.
6) Once the egg is completely dry, pop the balloon with a pin or sharp object. Carefully pull out the balloon. You can put a sticker or paste paper layers over it.
Note: (If you wanted to make the egg mobile make a small hole, tape string inside and then cover up hole as best as you can!)
7) Make more eggs!

Competition Entries
Age 3 - 5 yrs Group

WINNER - FREDDIE’S CHICK PICTURE
We chose Freddie’s chick picture as we could see that it was mainly his own work with minimal adult input. We thought his picture was very unique, cheerful and a true representation of Easter. Well done Freddie!
Competition Entries
Age 6 - 10 yrs Group
.png)
.png)
WINNER - JESSICA’S PLAYDOH BUNNY CRAFT
We chose Jessica’s playdoh, bunny craft as you could see that she created this herself without any adult input. We loved the fact that she included the rainbow representing the NHS, the cheerful bunny and basket of eggs representing Easter and the yellow flower depicting the beauty of Spring. Well done Jessica!
.png)


